Proper t-shirt design placement is crucial for both aesthetic appeal and brand identity‚ ensuring designs are visually striking while maintaining functionality. Balancing creativity with practical considerations ensures professional results.
1.1 Importance of Proper Design Placement
Proper design placement on a t-shirt is essential for achieving a polished and professional look. It ensures that the design is visually appealing‚ balanced‚ and aligned with the intended aesthetic. Incorrect placement can distort the design‚ making it look unprofessional and diminishing its impact. Additionally‚ proper placement enhances brand identity by ensuring logos or artwork are prominently displayed. It also prevents designs from appearing cramped or overwhelming‚ maintaining a seamless integration with the garment. Accurate positioning‚ such as placing designs 3 inches below the neckline and 2 inches from the armpit‚ ensures a balanced look. This attention to detail is crucial for creating a wardrobe that stands out while maintaining functionality and comfort.
1.2 Overview of Key Design Areas on a T-Shirt
A t-shirt offers several key areas for design placement‚ each with unique visual impact. The left chest and center chest are popular for logos‚ typically placed 3 inches below the neckline and 2 inches from the armpit. The full front allows for larger‚ bold designs‚ while the sleeve offers space for smaller‚ complementary artwork. The upper back is ideal for brand names or phrases‚ often aligned with the neckline. Additionally‚ the outer neck collar area can feature subtle details. Understanding these zones helps creators balance aesthetics and functionality‚ ensuring designs are both visually striking and appropriately sized for their intended location. Proper alignment tools‚ like rulers‚ are essential for achieving precise placement across these areas.

Key Considerations for Design Placement
Understanding standard print locations‚ choosing the right design size‚ and using measuring tools ensures accurate placement‚ aligning creativity with functionality for professional-looking results.
2.1 Understanding Standard Print Locations
Standard print locations on a t-shirt are essential for ensuring designs are visually appealing and functional. Common areas include the left chest‚ center chest‚ full front‚ sleeves‚ upper back‚ and outer neck collar. The left chest is ideal for small logos‚ while the center chest and full front are better for larger‚ bold designs. Sleeves are great for complementary graphics‚ and the upper back is perfect for striking visuals. Proper positioning‚ such as placing designs 2-3 inches below the neckline and avoiding armpit areas‚ ensures a balanced look. Understanding these locations helps create cohesive designs that align with branding and style goals‚ making them both professional and visually impactful.
2.2 Choosing the Right Size for Your Design
Choosing the right size for your design ensures it looks balanced and proportional on the t-shirt. For adult shirts‚ designs typically range between 8×8 inches to 11×11 inches‚ while youth sizes are slightly smaller‚ around 7×7 inches to 10.5×10.5 inches. The size should complement the shirt’s dimensions and the wearer’s body type. A design that is too large can overwhelm the garment‚ while one that is too small may be less visible. Measure the chest area and consider the placement location to ensure the design fits naturally. Using a t-shirt ruler guide can help achieve accurate sizing and alignment. Proper sizing enhances both aesthetics and functionality‚ making the design stand out without compromising comfort or practicality.
2.3 Measuring Tools for Accurate Placement
Accurate placement requires the right measuring tools to ensure designs align perfectly. A T-shirt ruler guide is essential for centering designs‚ with markings to help position logos or artwork symmetrically. Measuring tapes are useful for precise distance calculations‚ such as placing designs 3 inches below the neckline or 2 inches from the armpit. Laser alignment tools provide advanced precision‚ especially for intricate designs. Printouts of the design can be placed on the shirt to visualize placement before printing. Digital tools‚ like design software‚ also aid in pre-testing positioning. Using these tools ensures proportional alignment‚ avoiding common mistakes like uneven spacing or misalignment‚ and guarantees professional‚ polished results.

Popular Design Placement Areas
Popular t-shirt design areas include the left chest‚ center chest‚ full front‚ sleeves‚ upper back‚ and outer neck collar‚ each offering versatile ways to make designs stand out.
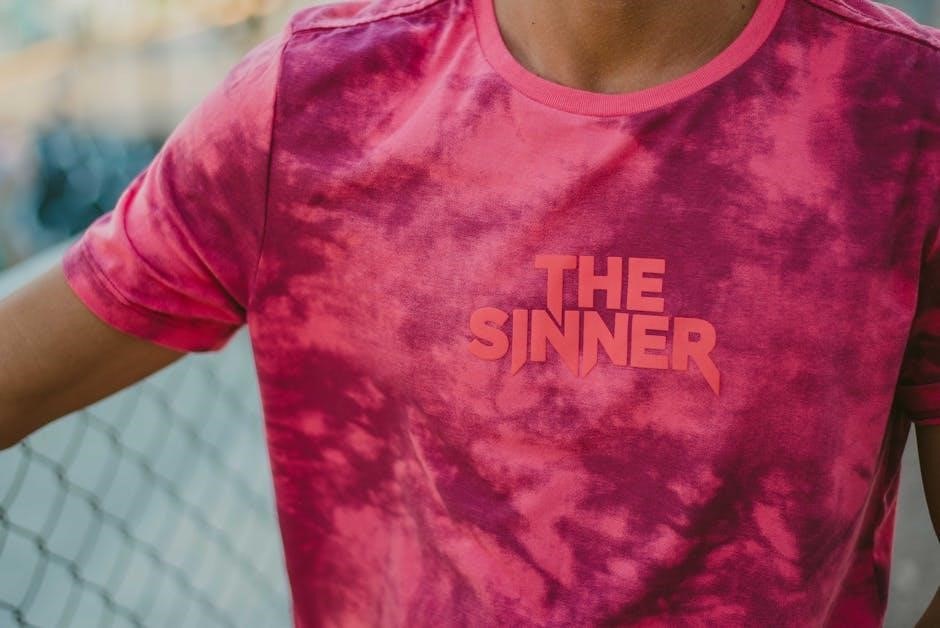
3.1 Left Chest Placement
The left chest area is a popular and subtle location for t-shirt designs‚ often used for logos or small graphics. It is typically positioned about 3 inches below the neckline and 2 inches from the armpit‚ ensuring a balanced and professional look. This placement is ideal for creating a clean‚ understated design that doesn’t overpower the shirt. It works well for both adult and youth sizes and is suitable for various fabric types‚ including cotton and polyester blends. The design size usually ranges from 3×3 inches for smaller logos to 4×4 inches for larger graphics. This spot is versatile‚ accommodating text‚ graphics‚ or combined designs without overwhelming the garment.
For optimal visibility‚ ensure the design aligns with the shirt’s natural drape and doesn’t stretch unevenly. This placement is favored for its subtlety and ease of integration into everyday wear‚ making it a timeless choice for casual and professional settings alike.
3.2 Center Chest Placement
Center chest placement is a popular choice for t-shirt designs‚ offering a bold and eye-catching display. This location places the design directly in the middle of the chest‚ typically 3 inches below the neckline and 2 inches from the armpits. It is ideal for logos‚ graphics‚ or text-based designs‚ ensuring maximum visibility. For adult shirts‚ the design area is usually around 11×11 inches‚ while youth sizes are slightly smaller‚ such as 10.5×10.5 inches. This placement works well for both casual and professional designs‚ creating a balanced and polished look. The centered design ensures it doesn’t appear cluttered‚ making it a versatile option for various styles and fabric types.
Proper alignment is key to achieving a professional result‚ as the design should align proportionally with the shirt’s dimensions. This placement is particularly effective for making a statement while maintaining a clean aesthetic‚ ensuring the design remains the focal point without overwhelming the garment.
3.3 Full Front Placement
Full front placement covers the entire front of the t-shirt‚ making it a striking and bold design choice. This placement is ideal for large graphics‚ intricate artwork‚ or detailed logos that demand attention. The design typically starts about 3 inches below the neckline and extends downward‚ centered to ensure symmetry. For adult shirts‚ the design area is often around 11×11 inches‚ while youth sizes are slightly smaller‚ such as 10.5×10.5 inches. Full front placement ensures the design is the focal point‚ creating a strong visual impact. However‚ it’s important to balance the design to avoid overwhelming the garment. This placement works well for bold statements or complex designs‚ making it a popular choice for artistic and promotional purposes.
Proper alignment and proportional sizing are critical to maintain a professional appearance‚ ensuring the design complements the shirt’s dimensions without appearing cluttered.
3.4 Sleeve Placement
Sleeve placement is an excellent way to add subtle yet impactful designs to a t-shirt. Designs on the sleeve are typically placed 3-4 inches below the shoulder seam‚ centered for symmetry. This area works well for smaller graphics‚ logos‚ or text‚ as it complements the shirt without overwhelming it. Sleeve designs should be proportional to the arm length‚ ensuring they don’t appear too large or too small. For adult shirts‚ designs are often 8-10 inches tall‚ while youth sizes are slightly smaller. The sleeve placement enhances the overall aesthetic of the t-shirt while maintaining balance. It’s ideal for adding secondary branding or artistic elements that don’t compete with the primary design on the chest or back. Proper alignment is key to achieving a polished look.
3.5 Upper Back Placement
The upper back placement is a popular choice for designs‚ offering a clean and professional look. Ideally‚ the design should be centered and aligned with the chest area for symmetry. For adult shirts‚ the design should be placed approximately 3 inches below the collar‚ ensuring it doesn’t interfere with the neckline or shoulder seams. The size should be proportional to the shirt‚ typically ranging from 8 to 10 inches wide for a standard fit. This placement works well for logos‚ text‚ or graphic elements‚ as it maintains visibility without overwhelming the garment. Using a ruler guide or measurement tools ensures accurate positioning and alignment‚ creating a polished finish.
3.6 Outer Neck Collar Placement
The outer neck collar placement is a subtle yet impactful area for designs‚ often used for small logos or text. It sits just below the neckline‚ typically 2-3 inches down from the collar seam. This placement works well for minimalist designs‚ as it avoids overwhelming the wearer while maintaining brand visibility. For adult shirts‚ the design should be centered and proportionally aligned with the collar. Avoid placing designs too close to the shoulder seams or overlapping with sleeve prints. This area is ideal for complementary graphics that enhance the overall aesthetic without distracting from the main design. Proper alignment ensures a polished look‚ making it a popular choice for professional and casual wear alike.
Specific Placement Guidelines
Designs for adults should start 2.5 inches below the collar‚ aligning proportionally with the body. Youth designs require slightly smaller measurements‚ around 2 inches down‚ ensuring balanced placement for smaller frames. Fabric type also influences placement accuracy‚ with stretchy materials needing adjusted measurements for optimal print alignment. Proper alignment ensures a polished‚ professional finish regardless of design complexity or fabric variation.

4.1 Placement for Adult T-Shirts
For adult t-shirts‚ design placement should be strategic to ensure a balanced and visually appealing look. The standard placement for adult designs is approximately 3 inches (7 cm) below the neckline and 2 inches (5 cm) from the armpit‚ ensuring proportional alignment. This positioning avoids the design being too low or off-center‚ which can make the shirt appear unprofessional. The design size typically ranges from 10×10 inches to 12×12 inches‚ depending on the intended impact. For centered designs‚ align the graphic symmetrically along the chest area. Avoid placing designs too close to seams or hems‚ as this can disrupt the overall aesthetic. Testing the design positioning on a mockup before printing is highly recommended to achieve the best results.
4.2 Placement for Youth T-Shirts
For youth t-shirts‚ design placement requires careful consideration to ensure a balanced and age-appropriate look. Designs should be scaled down proportionally‚ with smaller dimensions compared to adult sizes. A common recommendation is to place designs 2.5 inches below the neckline‚ centered evenly across the chest. For youth sizes‚ the design area is typically around 10.5 x 10.5 inches‚ ensuring it doesn’t overwhelm the garment. Avoid placing designs too close to the armpits or seams‚ as this can cause distortion. Centered designs work best‚ while left chest placements should be smaller‚ around 3-4 inches wide. Using a ruler guide helps achieve precise alignment and proportions‚ ensuring the design looks polished and professional on younger wearers.
4.3 Placement for Different Fabric Types
Fabric type significantly influences design placement on t-shirts. Cotton and polyester blends are the most common‚ offering a smooth surface for prints. Tri-blend fabrics‚ with their stretchy nature‚ require slightly smaller designs to prevent distortion. For heavy fabrics like canvas‚ larger‚ bolder designs work best. Soft‚ vintage-feel fabrics may need more precise placement to avoid overwhelming the material. Stretchy fabrics like rayon or tri-blend should have designs placed slightly smaller to maintain clarity during movement. Always consider fabric weight and texture when choosing design size and placement to ensure optimal visual appeal and durability.
Advanced Placement Techniques
Advanced techniques involve using specialized tools like rulers or laser alignment guides to ensure precise placement‚ enhancing both accuracy and visual appeal while balancing multiple design elements effectively.
5.1 Using a T-Shirt Ruler Guide for Alignment
A t-shirt ruler guide is an essential tool for achieving precise design alignment. It helps creators ensure designs are centered and proportionally placed‚ avoiding common placement errors. The guide typically features measurements for adult and youth shirts‚ with markings for standard print locations like the left chest‚ center chest‚ and full front. By aligning the ruler with the neckline and armpit seams‚ designs can be positioned accurately‚ ensuring a polished and professional finish. This tool is particularly useful for balancing multiple designs on a single shirt and meeting production standards. Whether for logos‚ artwork‚ or text‚ a t-shirt ruler guide simplifies the alignment process‚ ensuring consistent and visually appealing results.
5.2 Avoiding Common Placement Mistakes
Avoiding common placement mistakes is essential for achieving professional results in t-shirt design. One frequent error is improper measurement‚ leading to designs that are either too large or too small for the intended area. Another mistake is poor alignment‚ where designs are not centered or symmetrical. Placement too close to seams or edges can make the design look unprofessional. Additionally‚ ignoring the proportions of the shirt‚ such as placing a large design on a youth-sized tee‚ can detract from the overall appeal. To avoid these issues‚ use a t-shirt ruler guide for accurate alignment and test the design positioning before printing. Ensuring the design is proportional to the shirt size and placement area is key to a polished finish.
5.3 Balancing Multiple Designs on a Single Shirt
Balancing multiple designs on a single shirt requires careful planning to avoid clutter and ensure visual harmony. Start by identifying a focal point‚ such as a large graphic on the chest‚ and complement it with smaller‚ secondary designs on sleeves or the upper back. Symmetry is key; align designs proportionally to maintain a polished look. Use measuring tools like a t-shirt ruler guide to ensure accurate placement and spacing. Avoid overcrowding by leaving sufficient space between designs. Consider the shirt’s fabric type and size to scale designs appropriately. Testing the layout on a mockup before printing is essential to ensure a cohesive and professional finish. This approach creates a balanced‚ visually appealing design that enhances brand identity and aesthetic appeal.

Special Placement Considerations
Special placements like hems and pockets offer unique design opportunities‚ while overlapping designs create striking effects. These placements require careful balance to avoid clutter and ensure a polished look.
6.1 Hem and Pocket Area Designs
Designs placed near the hem or pocket area can add a subtle‚ stylish touch to a t-shirt. These placements are ideal for smaller‚ complementary graphics or text that don’t overwhelm the main design. For hem designs‚ ensure the artwork is proportionate to the space‚ typically 2-4 inches above the hemline. Pocket designs should fit seamlessly within the pocket’s dimensions‚ avoiding distortion. Consider the shirt type‚ as pocket placements work best on graphic tees or those with chest pockets. Symmetry is key for a balanced look. Test the design positioning to ensure it complements the overall aesthetic without cluttering the garment. This placement is perfect for adding a secondary brand logo or a motivational quote‚ enhancing the shirt’s appeal.
6.2 Overlapping Designs for Unique Effects
Overlapping designs can create visually striking effects‚ adding depth and complexity to a t-shirt. By layering graphics or text‚ designers can achieve dynamic compositions that stand out. Proper alignment is essential to avoid clutter‚ ensuring each element complements the others. Tools like rulers or digital software help precise placement. Starting with a focal point and building around it maintains balance. Experimenting with contrasting colors or transparency enhances the overlap effect. However‚ excessive layering can overwhelm the design‚ so restraint is key. Testing the design on different fabric types ensures consistency. Overlapping designs are ideal for artistic or thematic concepts‚ offering a modern twist to traditional placement techniques. This approach requires careful planning but delivers unique‚ professional results.
Best Practices for Professional Results
Use measuring tools for precise placement‚ test designs before printing‚ and ensure proportional alignment. These practices guarantee polished‚ professional-looking results for your t-shirt designs.
7.1 Testing Design Positioning Before Printing
Testing design positioning before printing is essential to ensure accuracy and avoid costly mistakes. Start by creating a digital mockup or printing a hard copy to visualize the design on the shirt. Use a ruler or alignment tool to measure and mark the placement area‚ ensuring it aligns with standard guidelines‚ such as 3 inches below the neckline for chest designs. Lay the design on the t-shirt to confirm proportions and adjust as needed. Consider fabric type and stretch to ensure the design looks consistent when worn. Finally‚ review the design in different lighting conditions to check visibility and readability. This step ensures a polished and professional finish.
7.2 Ensuring Proportional Alignment
Proportional alignment is essential for creating a balanced and visually appealing design on a t-shirt. Proper placement ensures designs are neither too large nor too small‚ maintaining harmony with the garment’s dimensions. For adult shirts‚ designs should typically start about 2.5 inches below the collar and center on the chest‚ avoiding the armpit area. Youth designs require similar proportional adjustments‚ scaled down to fit smaller frames. Using a t-shirt ruler guide or measuring tools helps achieve precise alignment. Testing the design on a mockup before printing ensures the placement looks cohesive and professional. Balancing multiple elements‚ like logos and text‚ is key to avoiding a cluttered appearance. This step ensures the final product is polished and visually striking.
Effective t-shirt design placement balances creativity and functionality. Using guides and tools ensures professional results. Proper positioning enhances both aesthetic appeal and brand identity‚ making every design stand out.
8.1 Final Tips for Achieving the Perfect Design Placement
For flawless t-shirt design placement‚ always use a ruler or alignment tool to ensure accuracy. Test designs on different shirt types and sizes before finalizing. Keep designs proportional to the garment‚ avoiding oversized or too-small prints. Balance multiple designs symmetrically and consider fabric type for optimal results. Measure 3 inches below the neckline for chest placements and align designs with seams for a polished look. Practice makes perfect—experiment with positions and seek feedback. By combining these tips with a keen eye for detail‚ you’ll achieve professional‚ visually appealing results every time.